Going camping on bikes is just about the greatest thing ever. It’s amazing to travel through nature on a bike, with all the time in the world and everything you need to be comfortable along for the ride. It can be daunting to embark for the first time, but it is so immensely rewarding that if you’re thinking about it you should try it. I created this step-by-step guide to convince you that virtually anyone can do this. I recommend taking a friend or two for your first trip, so that you can learn together and share the load.

Step one: Get a bike
Have you got a bike? Yes? Onto step two. No? That’s okay! Read through the following regardless and it might help you develop a picture of the sort of bike that is right for you. You need to be relatively comfortable for days at a time, you’ll want gears that’ll get you up hills without needing to push your bike, and I’d suggest tires that are comfortable on and off tarmac.
Step two: Service your bike
There’s nothing worse than having a bike fail on you. That will pretty much only happen if you mistreat it, push it beyond its limits or have an accident. Knowing the limits and maintenance requirements of your bike is important, a road bike won’t really handle rocks or mud but can probably do a little bit of gravel. If you don’t know how to service your own bike that’s okay, taking it to a professional can give you peace of mind. Just make sure you tell them you’re planning to take it out for a few nights and don’t want any surprises, if they’re good mechanics they’ll take care of you.
Step three: Plan out your gearlist, what will you need?
Will you be gone one night or ten? Will you sleep in a motel and eat at the pub or cook your own meals and camp in the bush? For the sake of my own sanity, I’m not going to explain how to stay in a motel and will continue under the assumption you’re planning to do the latter. In which case, the following items will be required.
-
Sleeping system.
The easiest option is a sleeping bag, mat and tent. You may already have these items for camping or hiking. For your first trip just make sure you are warm and dry, don’t stress about shaving grams. There’s no need to buy a camping hammock or lightweight bivvy until you are sure you’ll make the most of it.
-
Cooking system.
Cooking by campfire is great, although it can be enormously time-consuming, and when you are hungry after a long day riding and it’s raining, forget about it. Firing up a stove and having hot soup within five minutes is way more my cup of tea. Though many great meals have been eaten from the lids of trangias it’s also important to think about how you are going to eat/drink. Bringing a cup is always a good idea.
-
Spare clothes.
At a minimum you want one set of clothes for riding, and one for when you’re not. Pack for the weather, and be prepared for wet and cold. Beanies, scarves and gloves can make a big difference to warmth while taking up little room. If you’re planning to jump in a river and go swimming, or are expecting heavy rain then don’t forget to bring a towel.
-
Bike repair kit.
Walking a bike thirty kilometers out of the forest because you got a flat tire is not anyone’s idea of a good day. If you have a serviced bike with reliable components, taking a spare tube, patch kit, tire levers, a pump and a set of alum keys is probably all you will need to do. There are all sorts of other tools you could take with you, but think about weight and how likely it is that you are actually going to need them. If you are travelling in a group it is important that every bike has its own repair kit, even if everything else is distributed.
Step four: Trial pack your bike
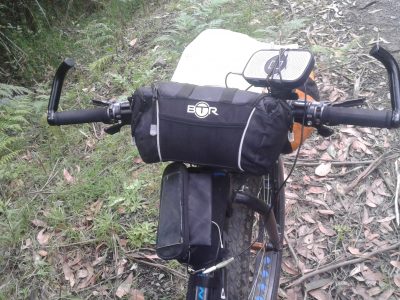
There are many ways to attach gear to a bicycle. People have been doing it for a hundred years or more. You don’t need fancy matching bags (except for being a legend on instagram) and you don’t need panniers although both work. The goal is to make sure your sleeping gear and spare clothes stay dry, the bike is reasonably aerodynamic and your stuff is securely attached. You can get creative with this, straps and racks and frame bags are all good options. I use an overnight bag for my cooking system which was salvaged from hard rubbish and my sleeping system is packed into a large lightweight compressible drybag. Once you have packed your bike once, you’ll be ready to go when you get the urge, rather than coming up with excuses.

Step five: Imagine yourself on the open road, camping, free…
This is an important and underrated step many guides overlook. Where do you want to be? Do you want to be riding up hills all day or sitting by a lake drinking tea and reading a book? Do you want to be rolling in a pack or grooving solo? You will only get out what you put in, and that also counts for snacks at the end of the day. You are allowed to pack fancy cheese, fairy lights and or whiskey. Keep in mind riding with a hangover is awful, I don’t encourage binge drinking but I do support hammock hanging.
Step six: Choose a route
I could write tomes about this. Keep it simple. If you haven’t done this sort of thing before you’re probably not used to how difficult it can be to maneuver and pedal a loaded bike. You’re not going to be smashing land speed records. Don’t plan anything too tough for your bike, or anyone else in your party. A winning choice for new riders is rail trails, they are reasonably flat, smooth, well connected with settlements and absent of cars. They also often link to train lines, so they are easy to meet at.
To browse my routes click here
Step six: Plan multiple camp options
This will help you adapt to circumstances. If it starts raining you might want to stop ASAP, or you might be having a cracker of a day and want to keep rolling past your planned site. Or it might all just be too hard and you’re ready to sleep after 10ks, that’s okay. If you have a few different sites in mind you can adapt as the day wares on. You might be like me, and okay to sleep pretty much anywhere when you’re tired. Or you might want to find that perfect spot by the river with the trees to hang your hammock. Try not to get stuck out riding into the night with no idea where you’re going to camp.
Step seven: Food and water
By now you’re probably hungry from reading 1000 words. You’re going to be a lot hungrier after cycling 50ks in the sun. I primarily carry lightweight dried or tinned food, so I can avoid worrying about refrigeration and what doesn’t get eaten on one trip can stay in my bag until the next one. Like nearly everything else on this list, this is all based on personal preference. My suggestion is that you’ll need:
- Snacks – Trail mix, dried fruit, chocolate, muesli bars etc. for during the day.
- Meals – Pasta, rice, lentils, soup, cous cous, etc. for the night.
- Breakfast – Cereal, bread, coffee etc. for the morning. But you’re on holidays, so you can have breakfast for dinner if you want too, I’m not the boss of you!
Things to think about are size, weight, energy content and the time something takes to cook. Rice crackers are great, except for their size to energy ratio. Precooked dehydrated meals (with a diy dehydrator) are an excellent way to eat lovingly prepared cuisine at camp. If you’re only going for one or two nights then making a meal with fresh ingredients is totally doable. Plan to eat a larger volume than you normally would, you’ll want it after a whole day riding.
My favourite lightweight easy meal for bike trips is pesto pasta. Pesto is super concentrated flavor, and angel hair pasta cooks with latent heat in a pot of boiled water. Stir in a tin of tuna or lentils and you’ve got a delicious balanced meal in under ten minutes.

Water is important. Water is life. Water is important.
You need to drink plenty of water to stay hydrated. You will also need water for cooking dinner and probably breakfast. That’s why it’s usually good to camp near water. I recommend carrying a minimum capacity of 3L and knowing where you’ll be able to top up. I have found there are ample fresh streams in the forest but make sure you have marked out a couple of places you’ll be able to top up on your route. It will save you rationing every last drop.
Step eight: Repack your bike
You’re just about ready to go. You’ve got a route, you know where you’ll probably be camping, you’ve sorted your food and you’re pumped. Now it’s time to repack your bike and take careful note that you have everything you need. It’s also really important to know where you’re packing everything, so you can access it with ease. Good ideas are to keep snacks accessible from the riding position and not to pack your spare tube at the bottom of your tent bag. Add in any last minute luxuries from your imagination session (eg. I like bluetooth speakers for blasting tunes) and tell a friend or loved one where you’re going.
Step nine: Have fun!

Every trip is different and there’s only so much you can plan for. You might want to upgrade all of your stuff after your ride, or you might want to put it in the shed and not use it for a while. You might want to write an epic tale of your adventure, or decide to live on your bike for a year!
If your adventure is in the Great Forest National Park I’d love to share it here on the website.
This is the first article of this kind I have written, I would love your feedback. If you have any questions, I am here to answer them.

